Using Constraint Tables
Prerequisites: Familiarity with basic HTML4 tags.
Objective: To create a web page that renders the same way regardless of the size of a visitor's browser window. One of the ways to accomplish this is to use a Constraint Table. A Constraint Table puts a limit on the size of the content area of a web page, making it look consistent.
STEP 1: Creating the base structure
Start a new HTML document containing the minimum tag set:
<html>
<head>
<title>Sample Page</title>
</head>
<body bgcolor="#FFFFFF" text="#000000">
</body>
</html>
STEP 2: Adding a Constraint
Because the Constraint table will enforce a maximum width for the web
page, it should consist of a single row and column. This table then
holds all of the content that will appear on that page. The page can
also hold multiple, identically sized Constraint Tables stacked on top
of each other.
Constraint Table widths are partially determined by the space required for the content. It should also take into account the resolution at which the visitor's screen might be set. The chosen width should also consider the display area lost to scrollbars and application window margins, as well as other factors that may reduce the visible area.
The lowest viewable screen width desktop/laptop display is 640 pixels, but most monitors typically show a width of at least 800 pixels. Consequently, these are the best widths to consider. While we are accustomed to scrolling vertically, a document that is wider than the display, will force visitors to scroll horizontally (pan) to view the full content.
When calculating the Constraint Table's width, deductions are required to account for window frames, scroll bars, window margins, and similar elements, all of which reduce the browser's display area. The following table serves as a basis for this:
| Resolution | Optimal | Comments |
|---|---|---|
| WebTV™ | 580 | TV based and very low-res. |
| 640 x 480 | 600 | Standard resolutions employed by Computer Display Adapters and Monitors. |
| 800 x 600 | 760 | |
| 1024x768 | 984 | |
| 1152 x 864 | 1112 | |
| 1280 x 1024 | 1240 | Ultra-high resolutions for large displays, and seldom used. |
| 1600 x 1200 | 1560 |
Once the desired width is selected, add the code for the Constraint Table to the document:
<html>
<head>
<title>Sample Page</title>
</head>
<body bgcolor="#FFFFFF" text="#000000">
<div align="center">
<table border="1" cellspacing="0" cellpadding="0" width="600">
<tr>
<td valign="top" width="600">
</td>
</tr>
</table>
</div>
</body>
</html>
Because the table acts as a delimeter, the table
tag's:
- height is deliberately omitted to allow content-controlled growth.
- cellpadding and cellspacing are intentionally set to 0 (zero).
- border is set to 1 for debugging purposes.
The entire code block is also centered to the display using the HTML4 <div> container.
STEP 3: Adding Content
Content is added within the td
tags of the Constraint Table. When adding content, it should be noted
that not all browsers allow tables to inherit attributes declared
outside them. Consequently, attributes that apply to the constrained
content should be set inside the constraint table.
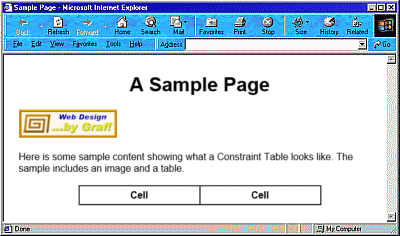
<html>
<head>
<title>Sample Page</title>
</head>
<body bgcolor="#FFFFFF" text="#000000">
<div align="center">
<table border="1" cellspacing="0" cellpadding="0" width="600">
<tr>
<td valign="top" width="600">
<font face="arial, helvetica" size="3">
<div align="center"><h1>A Sample Page</h1></div>
<img src="demo.gif" border="0" height="46" width="161"><br>
<br>
Here is some sample content showing what a Constraint Table
looks like. The sample includes an image and a table.<br>
<br>
<div align="center">
<table width="400" border="1" cellspacing="0" cellpadding="5">
<tr>
<td width="200" align="center"><b>Cell</b></td>
<td width="200" align="center"><b>Cell</b></td>
</tr>
</table>
</div>
</font>
<br>
</td>
</tr>
</table>
</div>
</body>
</html>
The preceding code produces the following result:
STEP 4: Wrapping Up
When done properly, the only difference between constrained and
unconstrained content should be that the unconstrained version's display
width is determined by the browser window's width.
Keeping the Constraint Table border visible while creating the document speeds up code and content debugging. Once everything checks out and all the cross-browser testing is complete, the table's border attribute can be turned off by setting it to 0 (zero).
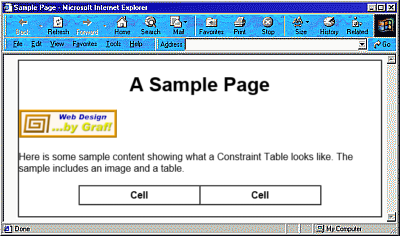
<html>
<head>
<title>Sample Page</title>
</head>
<body bgcolor="#FFFFFF" text="#000000">
<div align="center">
<table border="0" cellspacing="0" cellpadding="0" width="600">
<tr>
<td valign="top" width="600">
<font face="arial, helvetica" size="3">
<div align="center"><h1>A Sample Page</h1></div>
<img src="demo.gif" border="0" height="46" width="161"><br>
<br>
Here is some sample content showing what a Constraint Table
looks like. The sample includes an image and a table.<br>
<br>
<div align="center">
<table width="400" border="1" cellspacing="0" cellpadding="5">
<tr>
<td width="200" align="center"><b>Cell</b></td>
<td width="200" align="center"><b>Cell</b></td>
</tr>
</table>
</div>
</font>
<br>
</td>
</tr>
</table>
</div>
</body>
</html>
Here is the final version of the constrained document with the constraining border turned off: